.jpg)
Looking to spread the word about your music? As a music artist, this is probably on your mind every waking moment 😄 (when you’re not thinking about the next song to record, that is 🎶).
When it comes to distributing your music, there’s a big world of platforms you’re likely already using and driving traffic to: YouTube, Spotify, Deezer, iTunes, Google Play, and the list goes on.
And if you’re going on tour or trying to sell concert tickets for your next gig, there’s a whole other list of platforms you may be working with, such as Ticketmaster, Eventbrite, Bandsintown, and Songkick.
Now the common thread with all these music and event platforms is that they’re all hosted on websites you don’t own (yes totally pointing out the obvious 😂).
So for people you send from social media and ads to your songs on Spotify and iTunes, or to buy tickets to your show on Bandsintown, it’s a black box when it comes to potential fans who visit those platforms but don’t convert. You can’t easily reach these people again or add retargeting pixels to your songs or concert listings. And chances are you’re missing out on a lot of sales of songs, albums and concert tickets.
What might not be so obvious yet, is that you can actually reach these visitors and get more sales by retargeting them with ads from any channel! With PixelMe, of course 🎉.
Below you’ll find a step-by-step guide on how to retarget potential fans with Facebook Ads, though the steps are similar for other ads platforms you'd like to retarget in (Google, Twitter, etc.).
Retargeting your potential music fans
Before diving in, here’s a brief recap on how retargeting works with PixelMe.
Today, when you share links to other platforms (e.g. links to your songs on Spotify), everyone who clicked on those links and visited your profile is a great potential audience to turn into new fans. However, since you don’t own Spotify (or iTunes or Deezer…), it’s hard to retarget these people.
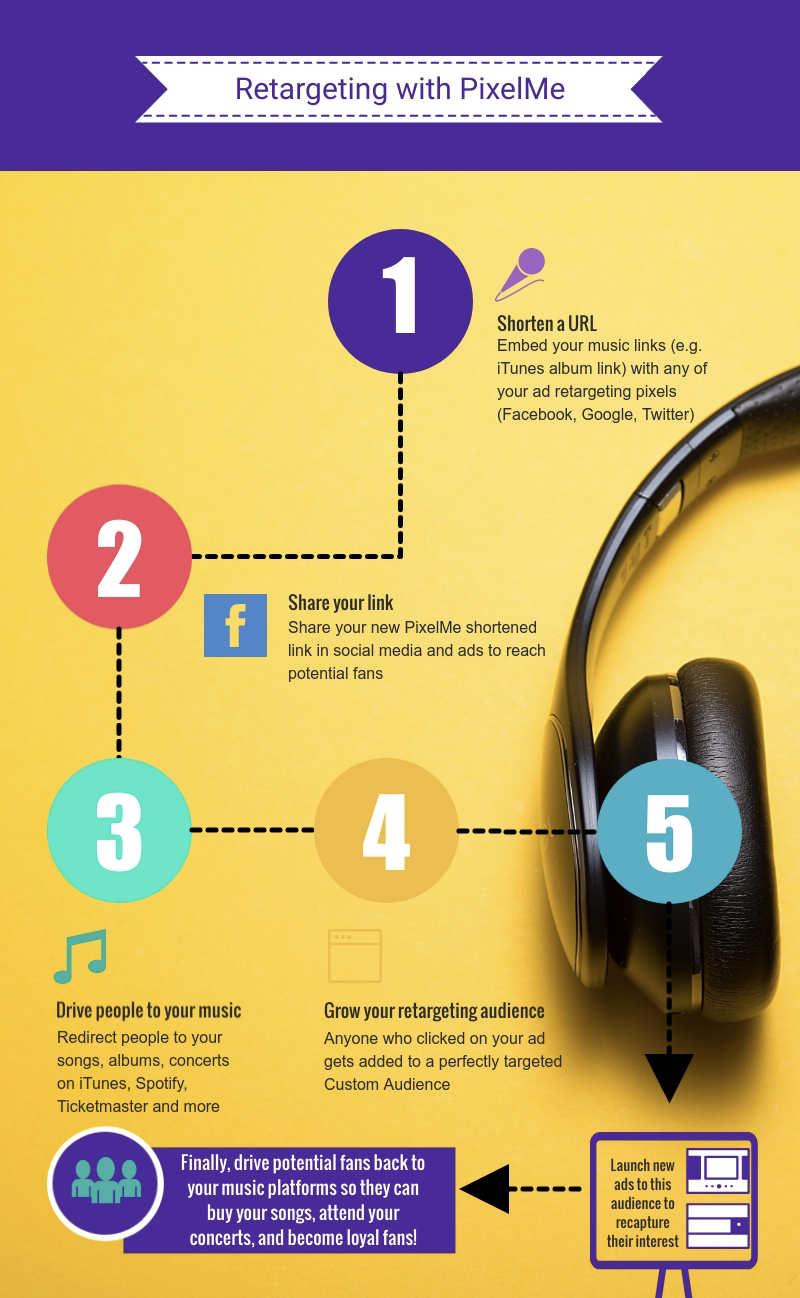
This is where PixelMe comes in! We let you embed your Facebook retargeting pixel in every link your share on social media and in ads. Every time someone clicks on your links, that person gets added to a Custom Audience you can reach afterwards in your ads.
Here are some visuals to piece it together:
So with that, let’s get started 💪
Step 1: Sign-up for a free PixelMe account
Visit app.pixelme.me/sign-up to sign up for a new account. We offer a free 7-day trial to every new sign up (no credit card needed!), so you can enjoy the full power of PixelMe for free 🤩.
Step 2: Add your retargeting Pixel IDs
Once you’re signed in and see your PixelMe dashboard, tap the Audience Builder icon 🔗 in the left-hand menu. Then, select "Settings" at the top to get to the Pixels tab.

To start, you’ll want to add the retargeting Pixel IDs from each of your ad platforms.
You can find your Facebook Pixel ID here, or your Pixel ID for any other ad platform here.
When you add your pixels, you can give each of them a name that’s easy to remember. It’ll be easier to select them again later when you shorten new links.
Now you’re now ready to embed a retargeting pixel to every link you share!
Step 3: Shorten every link with PixelMe
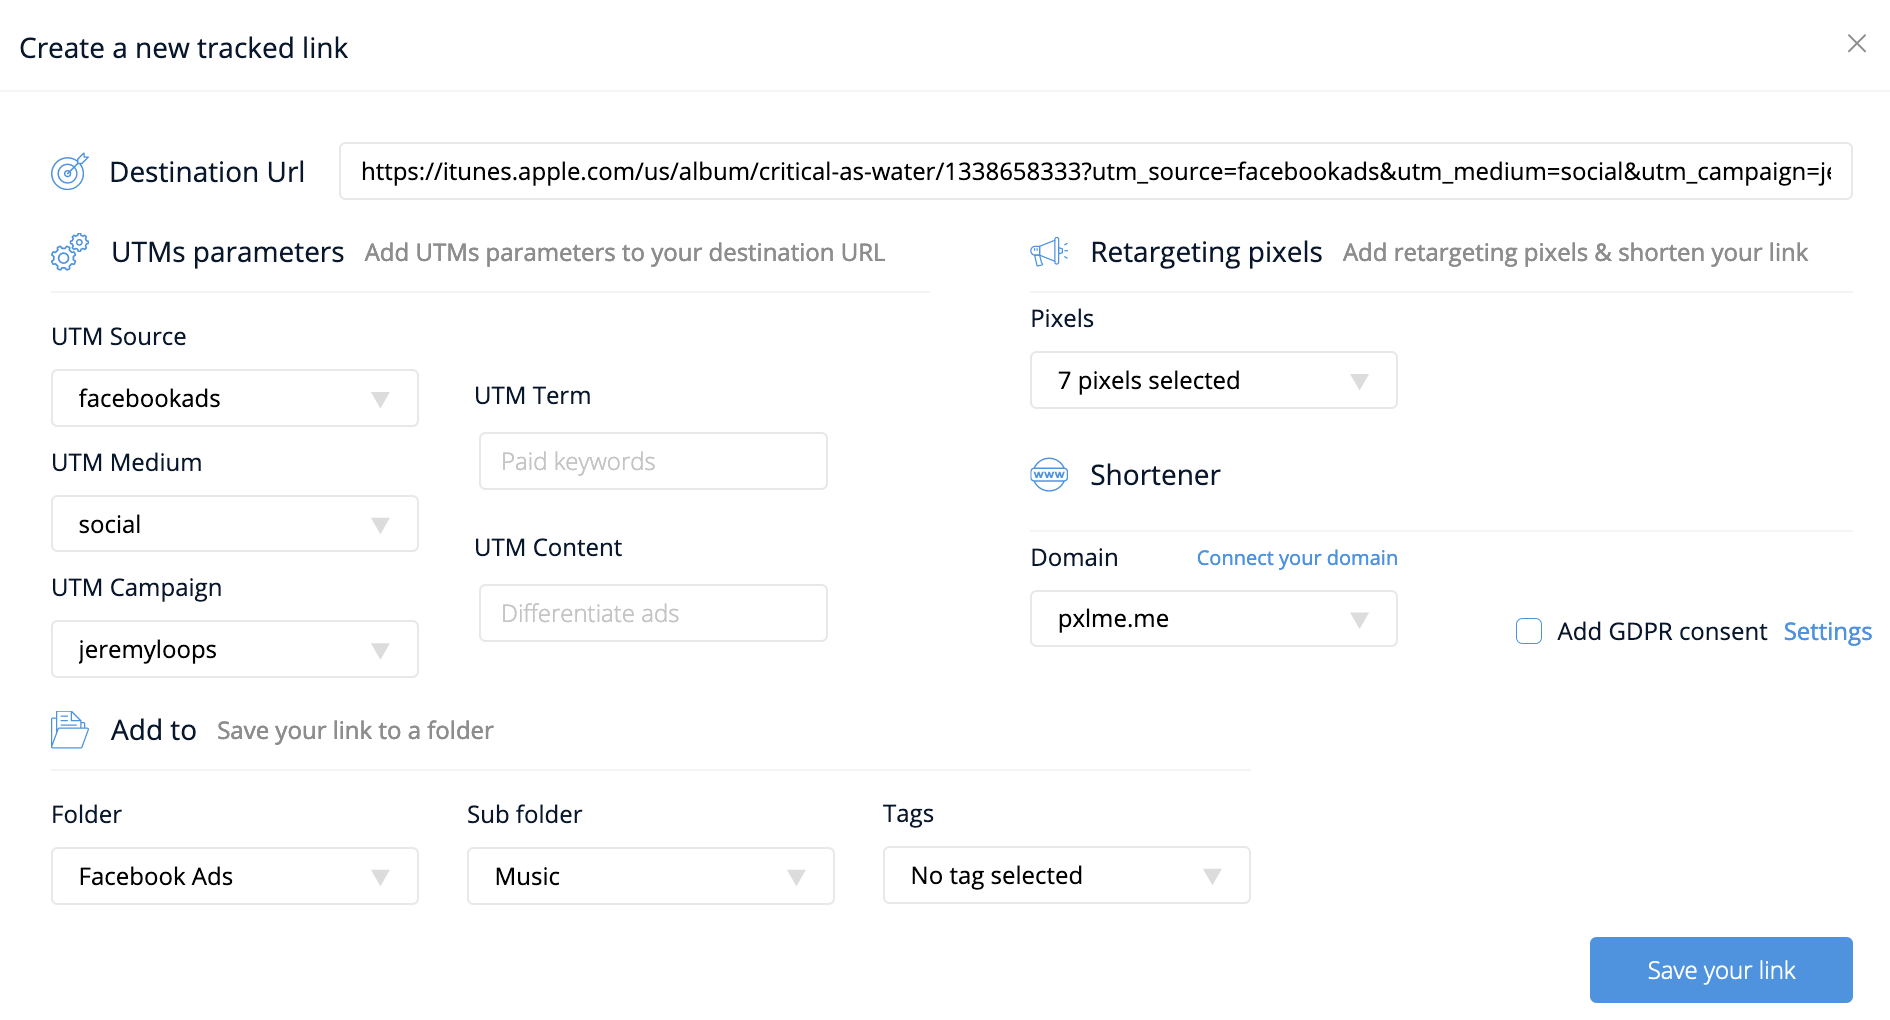
In your PixelMe dashboard, you’re now ready to start shortening every link with your retargeting pixels included. You can include just your Facebook Pixel or all your retargeting pixels in every link!
We typically include all our retargeting pixels so we have the option to retarget people with ads from any platform later on 😄.
To do this:
- Click on "Campaigns” at the top of your dashboard.
- In the top-right, click on the blue "Add a redirect" button.
- Then, paste your destination URL. E.g. paste the link to your music on iTunes.
- Under the "Pixels” drop-down, select as many pixels as you’d like.
- Add UTM parameters to your link so you can track where your click traffic comes from in your PixelMe dashboard. You can learn more about the 5 different UTM parameters here.
- Finally, to keep your links organized and track what you’re using them for, remember to add your links to Campaign and Sub-campaign folders 🗂️.
Then, hit “Save your link” 🙌
Now you’re all set! From the “Dashboard” eye icon tab in the left menu, go to the Campaign and Sub-campaign you created. Your link should be ready in your dashboard below like this:

You can hover and click on top of your newly shortened URL to automatically copy it and share the link in your Facebook Ads 🎉 (or create similar links to share across other social channels and ads).
When people click on the link from your Facebook posts, Facebook identifies them (assuming they have a profile, of course) and lets you turn those clicks into a highly targeted Custom Audience!
Step 4: Grow your retargeting audience
Once you’ve given your shortened URLs some time to generate traffic on LinkedIn, you should start seeing the number of clicks go up right away in your PixelMe dashboard 🚀.
Here’s how you can see the total number of clicks next to each link from different folders:


At the top of your dashboard, you’ll also be able to see the total number of clicks on all your links:

Now if you’ve created Custom Audiences in your Facebook Ads before, you may already know that it’s super important to see how big your Custom Audience is in Facebook directly.
In your Facebook Events Manager dashboard, you’ll be able to see your Custom Audience:

Having the number of clicks in PixelMe’s dashboard and the number of Pixel Fires in Facebook gives you an opportunity to compare both metrics:
- With PixelMe: Total number of clicks gives you a pretty good idea of how your links perform and the total audience you can reach.
- With Facebook: Pixel Fires are your total “targeting audience”. This corresponds to the total number of people who clicked on your link and who have been identified by Facebook on their platform. In other words, this is the number of people who will see your ads in the next step 😁.
Step 5: Create a Custom Audience from people who clicked on your links
Are you seeing your pixel fires in Facebook? That’s a great sign 👍. It means you set up your retargeting pixel correctly, and you’re gathering people who visited your music platforms for your new audience.
After a few days of sharing your link, you should have enough people to create a Custom Audience and launch your retargeting ad.
To start, from your Facebook pixel dashboard, click on “Create Audience” in the top left.
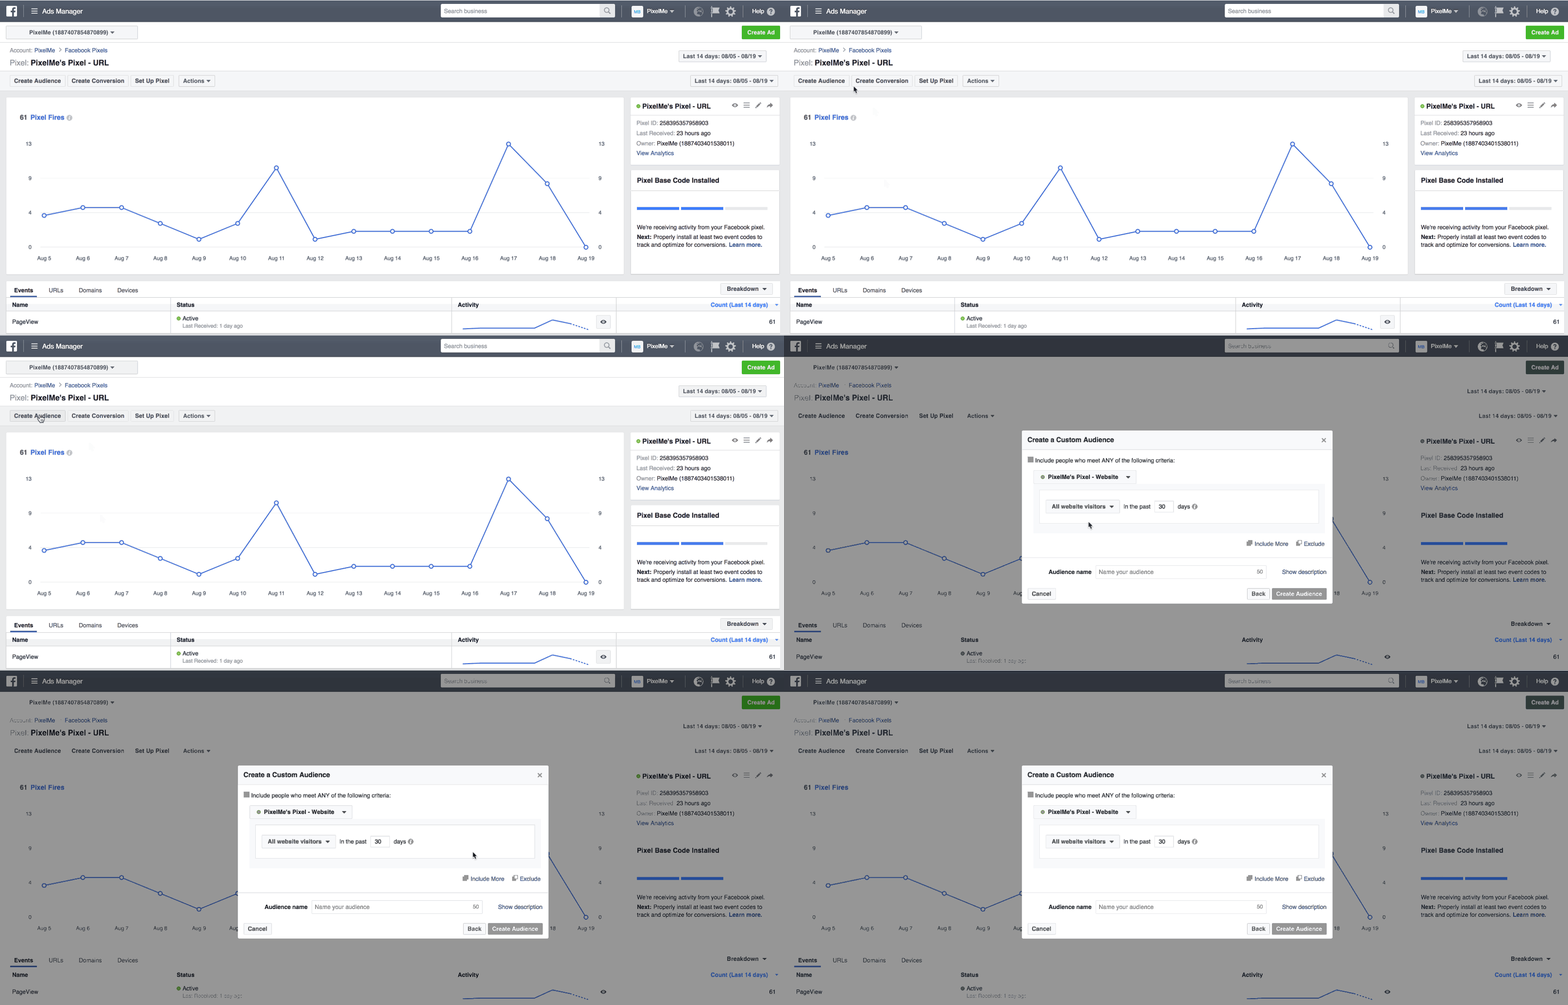
Then, filter your Custom Audience for all the people who visited a specific webpage.
There are two options you can take:
1️⃣Select URL > contains > and type “pxlme.me”
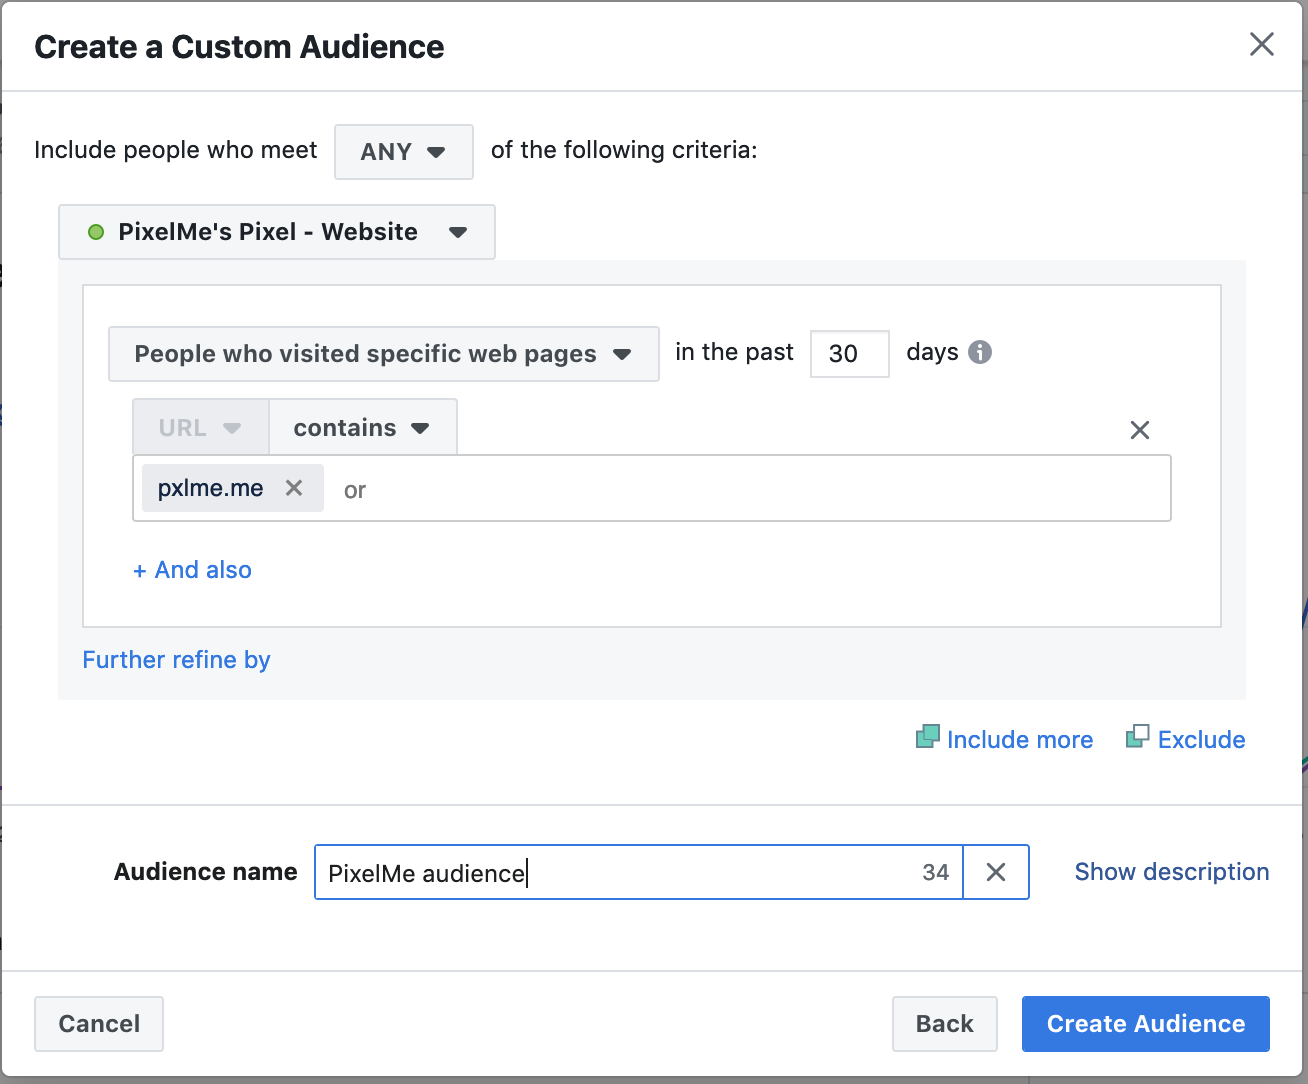
2️⃣Or, if you want to target users who clicked on specific links, you can set the URL to “exact” and put in the link(s) you want to use.
Simply copy/paste the shortened links from your PixelMe dashboard:

Then, give your Audience a name and hit “Create Audience”! 🤘
Step 6: Create Facebook Ads to retarget people who clicked on your links
You’re almost there - now that your Custom Audience is set up, let’s retarget your potential fans!
- In your Facebook Business Manager menu, select Ads Manager in the top left of the screen.
- Then, in the top left, click the green “Create” button to create a new Campaign, Ad Set, and Ad.
- When you’re making your new Ad Set, you’ll have the ability to customize the Audience. Next to Custom Audiences, click inside the “Add Custom Audiences” box > select Custom Audience, and you should see the list of all the Custom Audiences you’ve already created and the number of people each audience contains 😊.

Now, you’re ready to create the rest of your ad with creatives, text, format etc. If you’re looking for a guide to creating Facebook Ads, have a look at this awesome guide from Buffer 😃.
And there you have it! You now have all the steps you need on how to share links to all your music platforms with PixelMe, then retarget people who clicked on them with Facebook Ads, and begin getting more song plays, album sales, video views and concert sales 💪.
.svg)
%20(1).webp)